Made a hook for my oxy-acetylene hoses
The new shop keeps improving every day. Finally yesterday was the first time I needed to use my oxy acetelyne torch to bend some steel using heat.
After uncoiling the 50′ hose, I knew I didn’t want to hassle with that drama again so I decided to make a hook for the hose.
I grabbed a 1/8″ flat bar piece and cut it down to about 6″, after that I drilled two holes in the plate steel using a drill and self tapping screw, this option works very well if you just want some quick holes and you don’t want to change out bits on your drill press.
After cleaning up all the edges, I lopped off 12″ of 3/4″ bar stock and applied heat to the bar stock with a rosebud attachment on my oxy acetylene torch and bent the rod to an acceptable hook angle.
After everything cooled down, I welded the bar stock to the plate I drilled out.
At this point I saw room for another hook under the primary hook and lopped off a half circle section of a car spring I had laying around, so I welded that up as well.
After a biy of post weld wire brushing, here’s what the final hook looks like installed.
Now the oxy hoses have a home and there’s a small hook below that can hold the soapy water comnainer or bottle caps.
Thanks for reading.
More to come.
June 22, 2015 | Categories: blog | Tags: metal fabrication, metal shop hook, oxy acetylene torch | Leave a comment
Ladder fabrication
I was asked to make a ladder out of heavy duty rebar & some really nice steel bar stock.
After hearing my clients needs and making a quick prototype. I started cutting rebar & bending the steps. Here’s what that process looked like. Since I haven’t found a film crew to follow me around yet. You’ll have to deal with first person video 😛
After I got all cuts/bends for all the steps. I fit everything up to make sure everything lined up like it should. It did, perfecto!
I spent about ten minutes tacking up the steps & making sure they were square to the frame before welding. I then bolted down the ladder to the wood floor so the steel wouldn’t bow under the intense heat of the welder. I’m easily getting metal this thick to 10,000°F.
Forty five minutes later. Behold, a ladder.
At 8½ feet tall & weighing over 75 pounds. This ladder will easily hold 750 pounds per step. All within 1/16″ square from top to bottom.
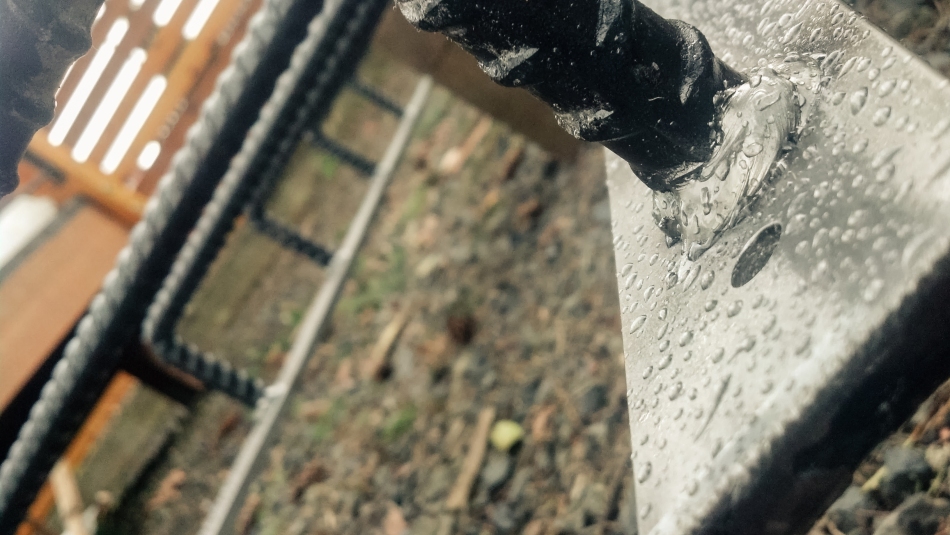
Here’s a sneak peak at the finished project after it’s received its waterproof seal.
All of this work will be available for viewing in three short months!
March 17, 2014 | Categories: blog | Tags: blacksmith, fabrication, Hand cut, oxy acetylene torch, portland, rebar, welding | Leave a comment
More about oxy acetylene cutting
The three primary ways to cut steel is mechanical (saws and blades) forced air plasma and oxy acetylene.
It takes a really steady hand to cut steel when using hand tools. The slightest waver amplifies when you’re trying to draw an extremely straight line, very slowly, with molten steel spattering all over the place.
Pro’s of using an Oxy torch:
- It’s reliable, all you have is brass fittings and valves.
- No electronics, no PhD users manual to figure out.
- It’s quiet, mechanical cutting is either slow and laborious or quick and deafeningly loud, plasma cutting gives off a loud hiss that gets obnoxious after a while as well.
- It’s cutting the distance (pun intended). It’s common to have a 50′ – 100′ hose length on an oxy cutting setup. All you have to do is move the lightweight torch head and rubber hoses and your cutting steel anywhere.
- Fumes are much less dangerous than Plasma cutters.
- Can cut up to 12″ think steel plate. You can cut up to 25′ thick steel with a gasoline torch setup. That’s not a typo, twenty five feet thick steel can by cut with setups like this.
- It’s safer than mechanical cutting which stores up allot of kinetic energy and this increases chances for injury.
Here’s a pair of sneakers I still rock when i’m doing metalwork. I almost hacked my toes off helping Richard Cawley (no fault of his) after a mechanical cutting wheel jumped out of my hand and somersaulted twice then landed directly on top of my foot with the wheel still spinning, fast. I was wearing flip flops right before this, it was mid summer 2013. Using cutting wheels on heights can be hellllllla sketchy. *Shoe laces were sheared in half. These are new laces.
Cons of using this setup:
- It’s slow and hot. You have to have a rock solid hand to cut well.
- It gives off carbon fumes. Not bad in the world of fabricating work. It’s still important to use respiration though.
- Thin metal will warp quickly.
So this whole thing kicked off from me being really pleased with how well my torch cutting is coming along. The following is a piece of 5/8″ thick angle iron that’s going to be mounted to a cedar fence.
Two light wacks of the hammer later that big piece of metal came off. I spent less than 15 seconds on each side lightly with the grinder. I then “finished the edges” by lightly taking the razor sharp metal edge off all the edges with a 45 degree bevel grind.
Here’s what it looked like less than a minute later.
There are spots in the middle where my cut deviated from the line too far and there’s a taper on my starting (left) side. I’ll always be hypercritical of my work. It’s what forces to to improve every day. I embrace this OCDelightful behavior. Then let it go when I see the beauty in the “flaws”.
I could spend two more minutes on this grinding and getting it completely square but I dig how it looks, After a quick rub down with some steel wool over the entire angle iron followed by a coat of sealant and this hand cut post will be ready for it’s install into the customs cedar fence it’s being made for. You’ll get to see this later on a much more sensational reveal. Excited to share the stuff coming out soon!
Here’s another little ditty about oxy fuel cutting worth sharing if you’re still reading ^^
Ciao for now.
December 23, 2013 | Categories: blog | Tags: fabrication, fabricator, Hand cut, metal work, oxy acetylene torch, Plasma cuttting, portland, steel plate | Leave a comment
Burn barrel jig prototyp’n
Note:
I’ve written more about this type of process here.
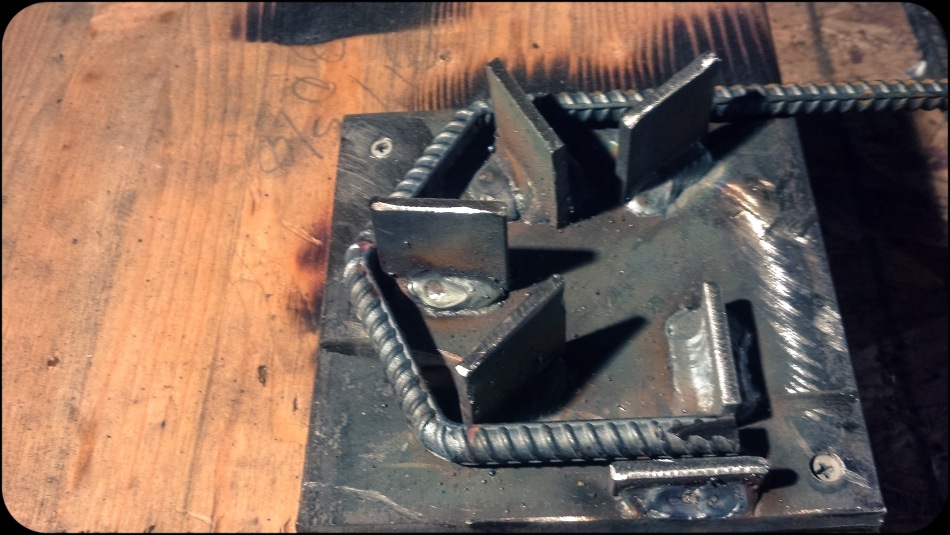
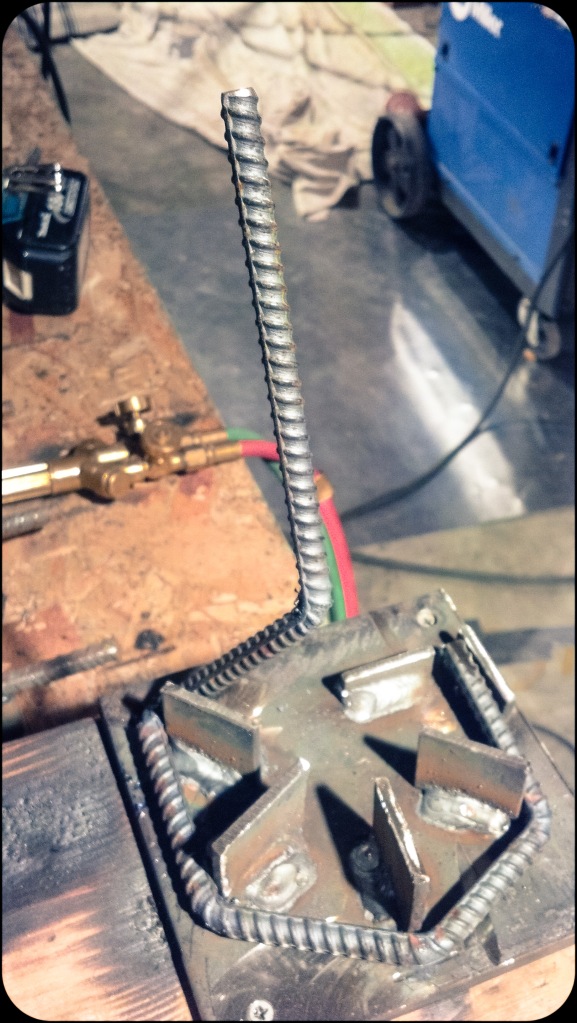
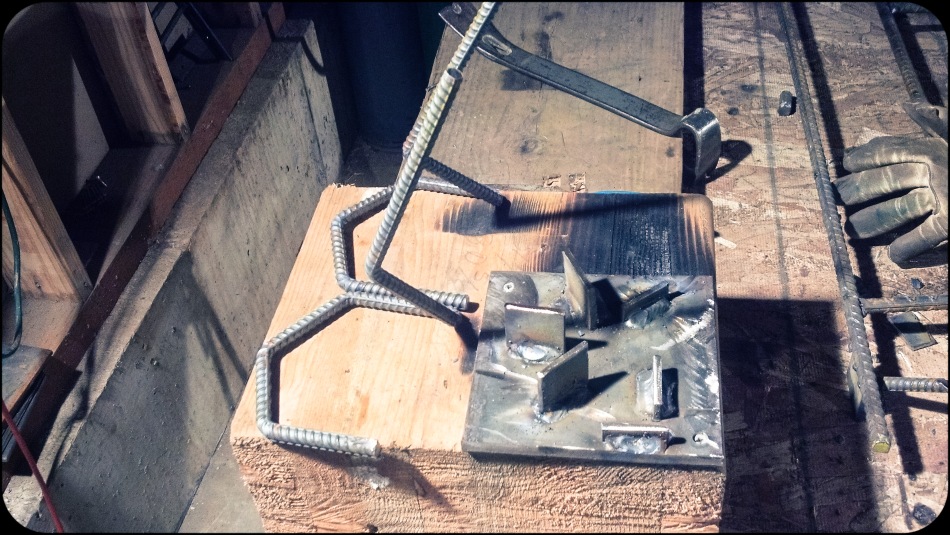
I needed to fabricate some legs for the burn barrels I’ve been commissioned to make. So I engineered this jig to allow me to take two foot long pieces of rebar and shape them to look like the images below and have a final vertical height of one foot after bending. There may still be some tweaks but anything at this point is refining. This is a good process that works well for consistent hand fabrication.
These picture with description is followed by a video of one being made (jump ahead a minute if you want to see the actaul bending happen). This was done in my workspace in North Portland, the day I left my iPod at home..
Here’s the first shot of just the jig without any bends on the metal.
Here’s the next picture with the metal bent around the base of the jig.
Here’s a picture after two additional vertical hand bends which wraps up the foot.
Here’s a final shot of two side by side, showing the usefulness of spending the extra time to make a jig. I can now consistently make one of these legs in less than 2 minutes,
Video.
December 1, 2013 | Categories: portfolio | Tags: art, blacksmith, blacksmithing, fabrication, fabricator, jig, metal, metal art, metal sculpture, metal work, mig welding, oxy acetylene torch, portland, steel plate | 1 Comment
Black Rock Stakes
Made by a burner, for burners. One of my side projects. I try to dedicate at least 10 hours to this a month. These are cutom made tent takes for the type that goes to the burn and other places where rugged gear is the standard. These tent stakes come in three sizes:
Rare – 12 inches
Medium – 18 inches
Large – 24 inches
Details on the Facebook page. Pre-order yours now if you want them in time for next years burn.
November 29, 2013 | Categories: portfolio | Tags: art, burner, burning man, fabrication, fabricator, metal, metal sculpture, metal work, mig welding, oxy acetylene torch, portland, repurposed materials, welding | Leave a comment
Quick Oxy Acetylene torch tutorial
In a round about way, this is a portfolio piece. It’s a testament to a small part of the training I received while in school for welding & fabrication.
October 21, 2013 | Categories: portfolio | Tags: art, fabrication, fabricator, Hand cut, metal, metal art, metal sculpture, metal work, oxy acetylene torch, portland, repurposed materials | Leave a comment
Repurposed shipping container
Here’s a project I assisted on. A local metal artist was commissioned to make a dumpster bin for a shop in North Portland. We took a wrecked cargo shipping container and cut down all the pieces to make the size container we wanted with an Oxy Acetylene torch and fabricated this on site.
October 19, 2013 | Categories: portfolio | Tags: art, fabrication, fabricator, metal, metal art, metal sculpture, metal work, oxy acetylene torch, portland, repurposed materials, steel plate, welding | Leave a comment
Fabricator certification
Here’s a picture of my mid term one weld away from being complete. All measurements within 1/16″ of blueprint specifications. I’ve also provided my teacher an hand drawn orthographic blueprint view of this project as part of my grade.
October 18, 2013 | Categories: portfolio | Tags: art, fabrication, fabricator, Hand cut, metal, metal art, metal sculpture, metal work, mig welding, oxy acetylene torch, portland, steel plate, welding | Leave a comment
Hand cut steel plate
This is a 5/8″ steel plate I initially cut out with an oxy acetylene torch before I cleaned up the edges with a track burner. The edges already look really good though. The smallest ticks or bumps in movement is severely exaggerated when hand cutting any metals like this.
October 17, 2013 | Categories: portfolio | Tags: fabricator, Hand cut, metal art, oxy acetylene torch, portland, steel plate, welding | Leave a comment
Track burner
Here’s a shot of a track burner being used. This is (usually) a oxy acetylene torch controlled to go forward of backward at a specified speed. This allows for very clean cuts over long pieces of metal.
This is the first tool I learned at school. Before I even learned to weld.
September 30, 2013 | Categories: portfolio | Tags: art, fabrication, fabricator, machining, metal, metal art, metal sculpture, metal work, oxy acetylene torch, portland, steel plate, track burner, welding | Leave a comment


